How to Modify Cow Face Pose (Gomukhasana)
- veronika

- Aug 17, 2020
- 4 min read
Updated: Jul 11, 2023

Cow Face pose, or "Gomukhasana" as it is called in sanskrit and "shoelace" as it's called in yin yoga, can be a screamer for many. If you are one of those people who finds extreme discomfort in Gomukhasana, don't worry my yogi friend! Fortunately, this pose can be done in a wide range of stages. If, however, you are someone who does not struggle with this pose, you may be wondering how to go even deeper.
I'm going to break down lots of options for you, and my hope is that you will be able to find a variation that works for your body. But before I do, it's important to take a look at what this pose stretches so that you know if you are getting the benefit in any of these variations. Primarily, this pose creates an internal rotation of the legs which stretches the outer hip. This area can get very tight, especially if you lead a mostly sedentary lifestyle. Add on top of that the various differences in hip bone structure and for some people this pose may seem close to impossible.
Traditionally, this pose is also accompanied with an arm bind, which I will explain in further detail below, as one of the variations you can take in the upper body. For now, let's start off with the least intense variation for the lower body.
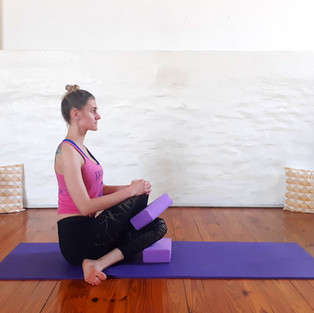
Pictured above are 3 options to begin to gauge the flexibility accessible to you in the outer hip. Start out in dandasana (staff pose), with both legs extended in front of you and your spine upright. If you have sensitive knees or are prone to hyperextension, place a rolled up blanket or pillow under the knees to lessen the extension of the legs. Then bend one knee and walk your foot in towards the inside of your other knee. This could be where you stop.
If you feel little or no sensation in the outer hip of the bent knee, cross the bent leg over your extended leg so that the sole of your foot is on the outside of the bottom knee. Notice if this increases the sensation in the outer hip. If you feel that you can take it deeper, stack the knee of the bent leg on top of the bottom knee, bringing that heel in as close to your hip as possible. You might stop at any degree between the second and third picture.
If your outer hip isn't screaming yet, bend the knee of the extended leg and take that heel in towards your other hip as is pictured above in the third image. If you need to back off a little bit, try sitting on top of a pillow, blanket, or block. If you find a gap between the floor and your bottom knee, and/or in between your bottom and top knees, fill it up with blocks or pillows.
To intensify the stretch in the outer hip you can walk your hands forward and come onto the hands or forearms. In a vinyasa practice or other yang style of yoga, try to keep the spine lengthened to protect the lower back, as pictured in the first image. In a yin practice where we are not engaging the muscles, let the back round. You can release your forearms down onto a pair of blocks at any height, or let your forehead rest on a block or both.
As I mentioned before, this pose is typically accompanied by an arm bind, which actually is what gives this pose its' name, cow face pose, because the shape imitates the face of a cow. To take the bind, clasp your hands behind your back. If you find it difficult to connect your hands, grab on to a strap or rag as pictured above in the image on the right. You can also fold forward with the bing to intensify the outer hip stretch while getting this shoulder opening.
Although the cow face bind is the traditional arm variation for this pose, you can also add side bending or twisting. To twist you can either stay upright as in the first picture above, or fold to the side if that feels accessible. As with the forward fold previously mentioned, you can also support your head and forearms on blocks if you are twisting to the side and folding.
You can also take a bind, side bend and twist in the very first variation I explained with one leg extended, to get the same benefit for the upper body, while managing the sensation in the outer hip.
Lastly, I want to return to yet an even more mild version of this pose. When taken on the back this variation can feel a bit more accessible than the seated version. You can start off with one knee stacked on the other and your hands wrapped around your knees. To take it a little further, grab on to your shins, ankles, or outer edges of your feet and draw your heels in towards your hips.
Watch the video below to see these variations explained and demonstrated:
Let me know in the comments below if you found a variation that works for you or if you still have any questions.
Do you want to practice yoga together? Check out my on-demand library of over 200+ Yin and Vinyasa yoga classes and meditation.


_edited.jpg)


Comments